 |

LabeLase� Producer
|
|
LabeLase� Producer
|
|
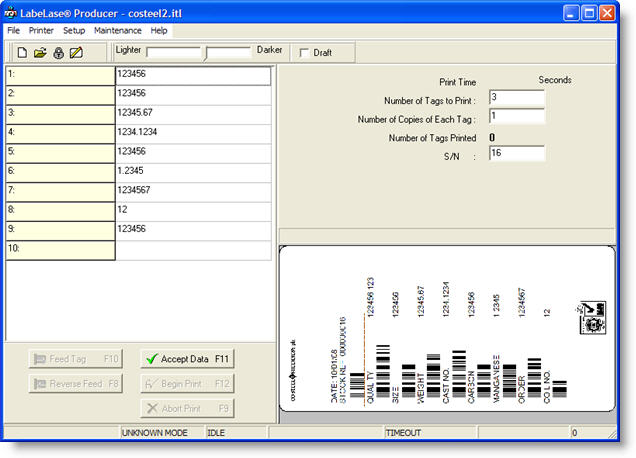
The program's main form is the primary interface for the operator to select a tag layout, enter data, and print tags. The form appears as shown in the example below.
|
|
| Please note that at the top of the form, in the title bar, is the name
of the currently loaded tag layout file. If no file is currently
loaded, "Untitled" will be shown.
|
| Data Entry
Whatever text the operator enters into the data entry fields will be added to the layout when the tag is printed. If the operator
wishes to preview the tag layout, including the just-entered data, prior
to printing, he/she should click on the Accept Data button
|
| Tag Information
The panel will also show the number of tags printed as well as the time it took to print the last tag. Additional fields may be shown here if specified by the tag layout's designer. These fields include: Serial Number, Serial Lower Limit and Serial Upper Limit. The designer has complete control over whether these fields are displayed, as well as the content of the prompts next to each field. The Operator Data Entry Configuration form provides access to the setup and configuration of these fields.
|
| Tag Image
The image is updated whenever the operator clicks on the Accept Data button (or presses the F11 key), and when the tag is printed. Please note that the quality of the image display may be less than what is actually printed on the tag due to loss of resolution when scaling a very large tag image to fit on the display. If you double click on the tag image, you will activate the Layout Designer form, which allows you to edit the tag layout. You must have Supervisor access to edit a layout.
|
| Control Buttons
|
| Status Bar
At the very bottom of the main form is the status bar. Several panels are used to provide information to the operator about the condition and status of the tag printer. As shown here, the printer is ONLINE and IDLE, meaning that it is ready to begin printing. Other status conditions, as well as error messages, will appear in this bar as needed.
|
| Menu
To access these advanced features, you must first put the program into "Supervisor" mode. Once in supervisor mode, the Setup and Maintenance menus become active. Note that just below the menu bar is a toolbar that contains one tool button. This button is a shortcut for opening tag layout files.
|
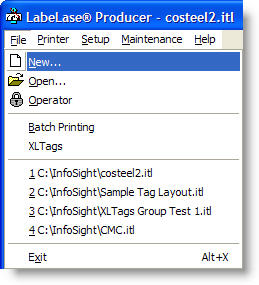
| File Menu
New - Allows the supervisor to create a new layout as a blank layout, from a template, or using a "wizard". Open - Allows the operator to open a tag layout file that is stored on the computer's hard disk, a floppy disk or network drive. Supervisor - Puts the program into Supervisor mode of operation, enabling the more advanced features. Note that a password will be required to enable this mode. Once the program is in the supervisor mode of operation, this menu item will be renamed to "Operator" providing a method of switching back to operator mode. Batch Printing - Allows the operator to print batches of tags, each with potentially different data, without interacting with the printer. The Batch Printing option is only active when a layout is loaded (shown here without a layout.) XL Tags - This option allows the operator to open a Microsoft Excel spreadsheet and print the data contained within it on tags. Files in the CSV (comma separated variable) format can also be loaded and printed. Exit - Exits the program. Between the XL Tags menu choice and the Exit choice is a list of up to 4 tag layout filenames. The program keeps track of the last four layouts loaded by the operator and allows them to be re-loaded quickly by clicking on the filename.
|
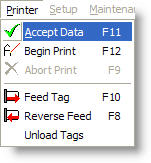
| Printer Menu
Accept Data - Selecting this menu item will accept the data entered by the operator into the Data Entry fields and redraw the tag image for preview. Begin Print - Select this menu item to begin printing tags. Feed a Tag - Select this menu item to feed one tag to the break-off position. Abort Print - Select this menu item to abort the current tag printing cycle. This menu item is only available if the program is currently printing a tag. Reverse Feed - Select this menu item to reverse feed a tag back into the printer. Unload Tags - Select this menu item to unload all tags from the printer. Note that all of the Printer menu items except for Unload Tags has an associated function key. Pressing the function key is the same as clicking the item in the menu.
|
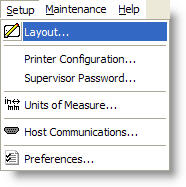
| Setup Menu
Layout - This menu item will activate the Tag Layout Designer form, which allows the supervisor to create and/or edit tag layout files. You can also activate this form by double clicking the tag layout image. Printer Configuration - This menu item will open the Printer Configuration form. This form allows you to specify the details about the tag printer such as its resolution in both axes, stepper motor rates, laser burn intensity, etc. Supervisor Password - This menu item will activate the Change Password form that allows the supervisor to change the password that activates the supervisor mode of operation. You will be required to enter the current password as well as the new password. Units of Measure - This menu item will activate the Units form that allows the supervisor to specify either English or Metric units of measure. When in English units, the basic unit of measurement is the inch. While in Metric units, the basic unit of measurement is millimeters. Host Communications - This menu item will activate the Host Communications form, which allows the supervisor to configure the communications link between the tag printer and the customer's information system (host.) Preferences - This menu item will activate the Preferences form, which allows the supervisor to configure certain program preferences.
|
| Maintenance Menu
Calibrate - This menu item will activate the Printer Calibration form, which allows the supervisor to run two different types of calibration routines (motor and laser.) Jog Printer Motor - This menu item will activate the Jog Printer Motor form, which allows the supervisor to jog the printer's motor (the tag feed drive-train.) View Printer I/O - This menu item will activate the Printer I/O Monitor form, which allows the supervisor to view the Input and Output signals of the tag printer. Digital to Analog Converter - This menu item will activate the Digital to Analog Converter Monitor form, which allows the supervisor to manipulate the D/A converter that controls the printer's galvanometer / mirror. Test Print - This menu item will cause the tag printer to print a special test tag image that can aid in printer setup / calibration. Clear Download Queue - New in V1.70 - This menu item will clear the host download queue, allowing you to discard previously downloaded but not-yet-printed data.
|
| Help Menu
Contents - This menu item will activate the Windows Help for the Producer program, including indexed search, tutorials, etc.
InfoSight on the Web - This menu item will activate a sub-menu for accessing various pages on the InfoSight website.
The Check for Program Updates menu item will open a dialog that will lead you through the process of checking for a newer program version on the website.
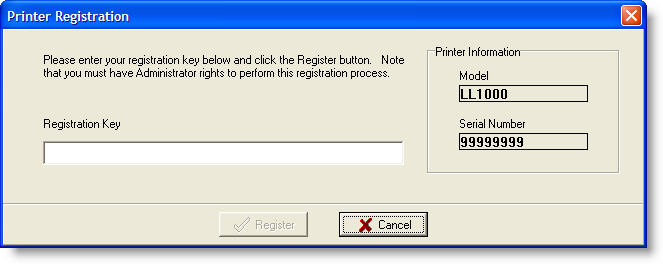
Register - New in V1.70 - This menu item allows you to enter the printer registration code you received when you registered your printer online at the InfoSight web site.
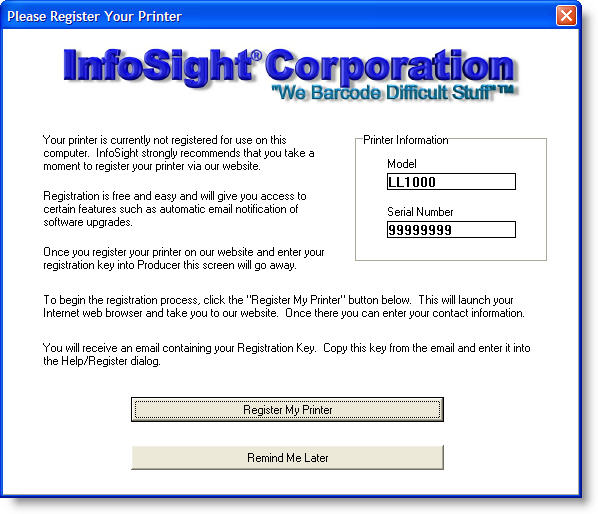
After you enter your Registration Key, click the Register button to save your registration and stop the display of the registration reminder screen shown below.
This registration reminder screen will appear when Producer starts and detects that it is connected to a printer that lacks a registration key. The registration key is obtained from the InfoSight web site when you click the Register My Printer button. Note that the PC running Producer must be connected to the Internet to obtain a registration key.
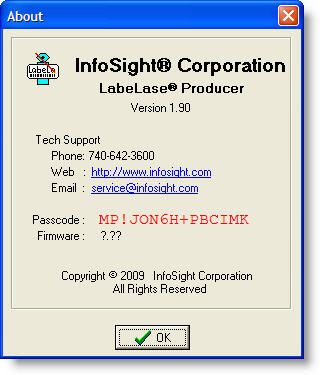
About - This menu item will activate the About form, which shows important information about the program including version number, printer firmware version, PassCode, etc. When contacting the factory for assistance, you may be asked to access the About form to provide details about your specific configuration. One important feature of the About form is the PassCode field. This is a special, encrypted field that can be used to obtain a one-time password in the event that your supervisor's password is forgotten or changed inadvertently. Should you need a temporary password, make a note of the PassCode setting and telephone the factory at 740-642-3600 for assistance. Please note that the PassCode setting will be different each time you access the About form. Any temporary password that is supplied by the factory is only valid until the end of the current hour. You may use the temporary password to change the supervisor's password.
|
| File Toolbar
|
| Configuration Toolbar
Lighter/Darker Slider - The slider track bar allows you quickly adjust the darkness of the printed tag. Moving the slider to the left makes the printed tag lighter, while sliding it to the right makes it darker. This track bar effects the "Print Speed" parameter. Draft - This checkbox allows you to switch between normal and draft modes. When in draft mode the printer uses a lower resolution resulting in lower quality tags, but they print at a faster rate. Note that when in draft mode, barcode fields with odd scale settings will be distorted.
|
Copyright © 2010 InfoSight Corporation All Rights Reserved
InfoSight ® is a registered trademark of InfoSight Corporation
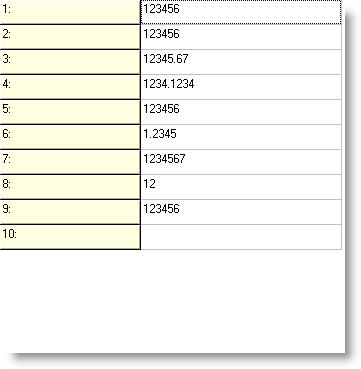 The
Data Entry area of the main form allows the operator to provide data for
the tag layout that may not be available until it is time to print the
tags. The designer of the tag layout can specify zero or
more
The
Data Entry area of the main form allows the operator to provide data for
the tag layout that may not be available until it is time to print the
tags. The designer of the tag layout can specify zero or
more 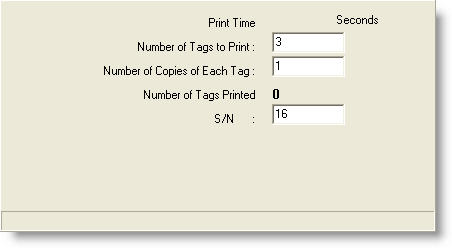 The
tag information panel provides information about the tag layout, and
allows the operator to specify the number of tags to print, quantity of
tags, etc.
The
tag information panel provides information about the tag layout, and
allows the operator to specify the number of tags to print, quantity of
tags, etc.
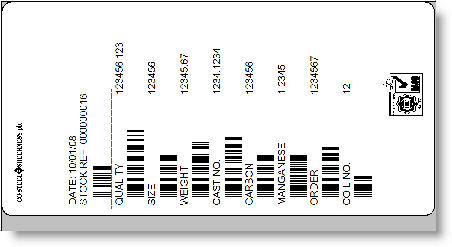 The
tag image panel provides a graphical picture of the tag layout as it
will appear when printed.
The
tag image panel provides a graphical picture of the tag layout as it
will appear when printed.
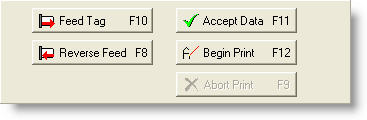 Four
buttons are provided to control the operation of the tag printer. These
buttons correspond exactly to the same functions provided in the Printer
menu (
Four
buttons are provided to control the operation of the tag printer. These
buttons correspond exactly to the same functions provided in the Printer
menu (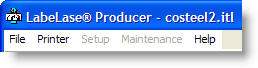 The
main form contains a menu bar at the top. The menus provided are
File, Printer, Setup, Maintenance and Help. Note that the
Setup and Maintenance menus are "grayed" indicating that they
are not accessible. This is the default "Operator" mode
of operation. When the program first starts, it is in this
operator mode and setup and maintenance functions are not accessible.
The
main form contains a menu bar at the top. The menus provided are
File, Printer, Setup, Maintenance and Help. Note that the
Setup and Maintenance menus are "grayed" indicating that they
are not accessible. This is the default "Operator" mode
of operation. When the program first starts, it is in this
operator mode and setup and maintenance functions are not accessible.
 The
The
 The
Printer menu gives the operator the ability to control various aspects
of the printer.
The
Printer menu gives the operator the ability to control various aspects
of the printer.
 The
Setup menu is only available in the Supervisor mode of operation and
provides several features for configuring the operation of the tag
printer.
The
Setup menu is only available in the Supervisor mode of operation and
provides several features for configuring the operation of the tag
printer.
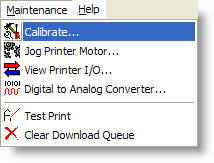 The
Maintenance menu is only available when in the Supervisor mode of
operation and provides several features that aid in the setup of the
printer and diagnosis of any problems you may encounter.
Note that under most circumstances, it will not be necessary to access
these functions. If you must use these functions, do so only
under the direct supervision of factory trained personnel.
The
Maintenance menu is only available when in the Supervisor mode of
operation and provides several features that aid in the setup of the
printer and diagnosis of any problems you may encounter.
Note that under most circumstances, it will not be necessary to access
these functions. If you must use these functions, do so only
under the direct supervision of factory trained personnel.
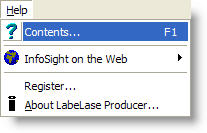 The
Help menu provides access to the program's built-in help facility, as
well as to information about the program itself.
The
Help menu provides access to the program's built-in help facility, as
well as to information about the program itself.
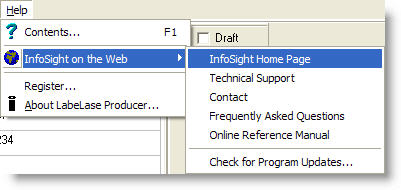 Each
of these items will launch your browser to take you to the appropriate
page on our website.
Each
of these items will launch your browser to take you to the appropriate
page on our website.