|
The Barcode tool is used to add a barcode field to the layout. A layout may have an unlimited number of barcode fields. |
||||||||||||||||||||
|
Once the field is added to the layout, you use the Properties Editor to change the field's properties.
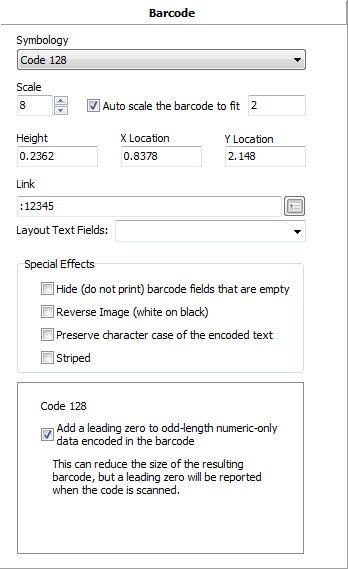
Each barcode field is defined by several pieces of information that you must supply. This information includes: Symbology This field defines the type of barcode, called its symbology. Click the down arrow button to the right of the symbology to drop down a list of supported barcode types. Link This field contains a list of links to other text fields in the layout, or alternatively, the actual data to be encoded in the barcode. To link to other text fields, simply enter the ID numbers of the text fields separated by commas. If you want to enter the data directly, begin with a colon ":" character and then type the text. You may enter the text directly in this field and press the Enter key, or to perform more advanced editing you can click the ellipsis button to the right of the text to open the Barcode Link Editor. Note that the text can contain certain special flags for automatic data insertion. Height The height of the barcode in inches or millimeters. Note that some barcode symbologies such as Data Matrix are not effected by the height setting. Scale The barcode scaling factor. The width of a bar in a 1D code is defined by a multiplication factor, or scale, times the width of the laser spot. If the laser spot size is 0.003 inches, a scale of 10 will produce a barcode X size of 0.030 inches. For certain 2D code symbologies such as Data Matrix, the scale factor is applied in both dimensions. Auto Scale Set this to true to enable auto scaling. The scale factor will be chosen automatically to make the barcode fit within the area defined by Auto Scale Width (below). Auto Scale Width Defines the area that the barcode must fit within and thus determines the scale factor. Hidden Set to true to hide the barcode. Hidden fields are shown in the designer but are not printed. Hide if Null If the contents of the data encoded in the barcode is empty (null) then selecting true will completely hide the barcode. If this field is not checked, the word NULL will be encoded as in prior versions. Leading Zero Some barcode symbologies are more efficient if they have an even number of digits encoded within them. In such cases, Producer will automatically add a leading zero character to odd numbered strings if this field is set to true. Preserve Case Producer normally converts the encoded text to upper case characters before encoding. Set this property to true if you want to preserve the original case of the encoded data. Reverse Set this property to true to print the barcode as white bars on a black background. Striped To reduce the time it takes to print a barcode you can enabled the "striped" property. When a barcode is striped every other scan line is removed from the barcode. Note that striping is only allowed when a barcode is rotated 90° or 180°. Also note that a striped barcode may not be displayed in the Designer when the zoom factor is not 100%. Verify Some models of InfoSight printers have the ability to verify the barcode. Set this property to true to indicate that this barcode is the one to verify. X The X coordinate of the lower left corner of the barcode. This field was initially filled in for you based on where you clicked the mouse. Y The Y coordinate of the lower left corner of the barcode. This field was initially filled in for you based on where you clicked the mouse. DataMatrix Num Cols The 2D Data Matrix symbology normally determines its optimum size (rows and colums) based on the data that is encoded. Leave this property set to 0 to have the symbology determine the optimum size. Set this to a non-zero value to force the number of columns in the printed barcode. DataMatrix Num Rows Set this property, along with the Num Cols described above, to force the 2D Data Matrix symbology to print a specific number of rows. Set it to zero to allow the symbology to determine the optimum size. PDF417 Truncated If this check box is checked, then the symbol will be printed in its truncated form. In a relatively "clean" environment where tag damage is unlikely (e.g. an office), the right row indicators can be omitted, and the stop pattern can be reduced to one module. This truncated form reduces the non-data overhead in the symbol (thus reducing its size) with the trade-off in reduced performance and robustness, or the ability to withstand degradation. PDF417 Aspect Ratio Enter the desired aspect ratio (number of rows to columns) for the symbol. The default value of 3 is recommended. If the Cols field is non-zero, then the Aspect setting is ignored. PDF417 ECC Each PDF417 symbol contains at least two error correction codewords. The Error Correction codewords provide capability for both error detection and correction. Enter the Error Correction level to specify the number of Error Correction codewords. If you leave the field set to the default value of -1, the program will determine an appropriate setting for you, based on the content of the message to be encoded. If you wish to specify a specific number of codewords, select an Error Correction Level from the table below:
PDF417 Data Cols Enter the desired number of columns in the resulting symbol. This setting is highly dependant on the number of codewords in the symbol, and it is recommended that you leave the field set to its default setting of 0, which will allow the program to determine the appropriate number of columns. If you specify the number of columns, you must enter a number between 1 and 30 inclusive. PDF417 Data Rows Enter the desired number of rows in the resulting symbol. This setting is highly dependant on the number of codewords in the symbol, and it is recommended that you leave the field set to its default setting of 0, which will allow the program to determine the appropriate number of rows. If you specify the number of rows, you must enter a number between 3 and 90 inclusive. Opticode Num Chars Sets the number of "characters" in the Opticode symbology. Set this property to match your Opticode® reader's configuration. Opticode Use Checksum Enables (true) the checksum in the Opticode symbology. Set this property to match your Opticode® reader's configuration. Opticode Checksum Modulus Sets the modulus of the checksum in the Opticode symbology. Set this property to match your Opticode® reader's configuration. Opticode Interleaved Enables (true) the interleaving of modules in the Opticode symbology. Set this property to match your Opticode® reader's configuration. QR Code ECC Level Sets the Error Correction Code Level for QR Codes. QR Code supports levels 'L', 'M', 'Q' and 'H'. Micro QR Code supports only levels 'L', 'M' and 'Q'.
|
||||||||||||||||||||
Binary Values in the LinkBinary Values in the Link - It may be necessary to specify a binary or control code value as part of the link field. For example, a 2D code may need to use a TAB character, record separator (RS), carriage return (CR) or other non-printable ASCII character embedded in the data. To include these values, use the colon ‘:’ character and specify the binary value in one of the following ways:
|
||||||||||||||||||||
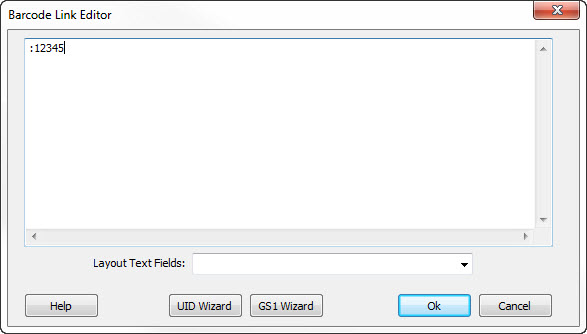
Barcode Link Editor
The Barcode Link Editor form provides a more comprehensive way to enter the data to be encoded in the barcode. You can select the list of text link IDs using the drop down list near the bottom of the form, or you can directly enter the data to be encoded.
|
||||||||||||||||||||
UID WizardThe UID Wizard button in the Barcode Link Edit form makes it easy to build the embedded barcode link string that is required for UID applications (Department of Defense.) Clicking this button will open the UID Barcode Wizard form.
|
||||||||||||||||||||
GS1 WizardThe GS1 Wizard button in the Barcode Link Edit form makes it easy to build the embedded barcode link string that is required for GS1 symbologies. Clicking this button will open the GS1 Barcode Wizard form.
|
||||||||||||||||||||