Rows and Columns
Once you have identified the fields that will be required to receive data from the data file, you can begin to build your Excel spreadsheet.
Columns - Each field in your tag layout requires a column in the spreadsheet. We recommend that the first row in the spreadsheet contain the
name of each field in its respective column. This will help match your spreadsheet format to the tag layout that that will receive the data.
Although you aren't required to have the field names in the first row, it can help to reduce the chance for errors when you print your tags.
Rows - Each tag that you want to print requires a row in the spreadsheet. As producer processes your spreadsheet, it will take each row of the
file one at a time and directly substitute the contents of each column with the associated field in your tag layout. Thus, each row in the
spreadsheet corresponds to one tag job. If you wish to print more than one copy of the tag, see the next section.
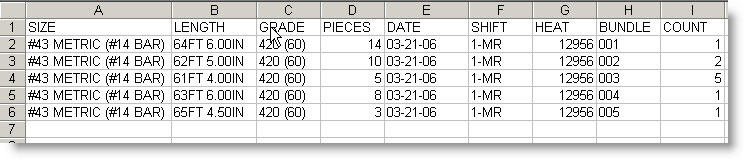
In the example shown above, the Excel spreadsheet contains 6 rows of data. The first row simply has the name of each field to help identify the
data in the file to the fields in your layout as shown below.
Note that column 'I' is labeled 'COUNT' and contains a number that does not correspond to any fields on the tag layout. This is an extra field
used to control the number of tags that can be printed for each row of data in the file. This is explained in more detail in the next section.
|
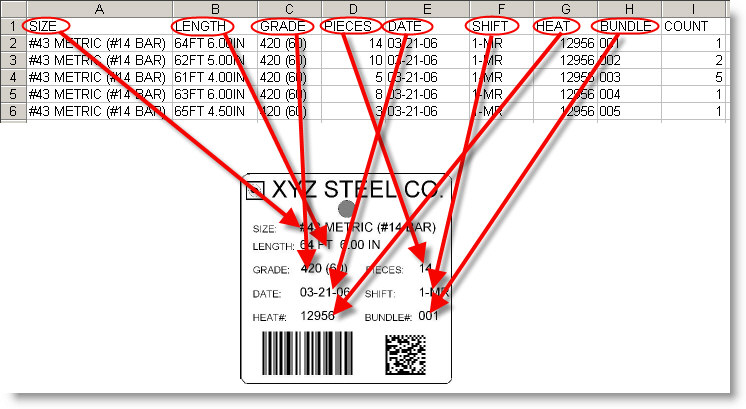
 This is a sample tag layout
created for our LabeLase® Designer tag layout tutorial showing a tag with many data fields. Note that some of these fields such as the words
"SIZE:" and "LENGTH:" are fixed fields that never change from tag to tag. Others, like "#43 METRIC (#14 BAR)" and
"64FT 6.00IN" are different (or can be) on each individual tag. These variable fields are the ones you need to include in your Excel
spreadsheet. We will add the other, fixed, fields to your layout so that they don't change.
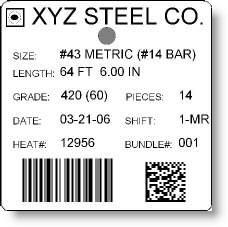
This is a sample tag layout
created for our LabeLase® Designer tag layout tutorial showing a tag with many data fields. Note that some of these fields such as the words
"SIZE:" and "LENGTH:" are fixed fields that never change from tag to tag. Others, like "#43 METRIC (#14 BAR)" and
"64FT 6.00IN" are different (or can be) on each individual tag. These variable fields are the ones you need to include in your Excel
spreadsheet. We will add the other, fixed, fields to your layout so that they don't change.