|
|
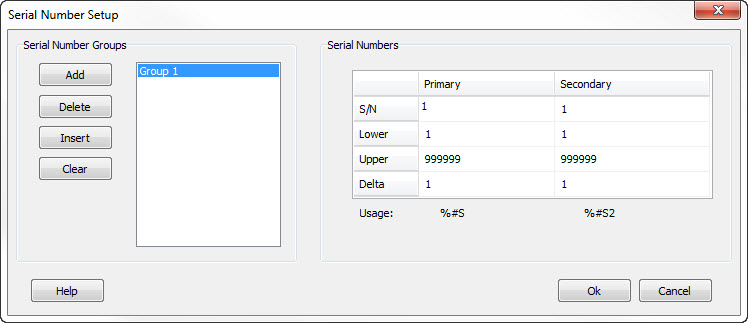
Method 1 - Numeric Only with Programmable RangeThe Serial Numbers Setup form allows you to configure the auto sequencing serial numbers for your layout. You can specify an unlimited number of serial number groups, consisting of two sequences each. Each group is independent from the other. When the serial number of the primary sequence reaches its limit (either upper or lower depending on the direction) then it wraps and the secondary serial number is incremented.
The Serial Number value must lie between its respective Lower and Upper limit values. The Increment value may be positive (count up) or negative (count down) and can be any number other than zero. These auto serial fields are numbers only and have a settable starting value, range, and increment value. The software allows an unlimited number of serial number groups. The serial number groups each have two sequence sets. Each set is linked such that when the first number in the set (Primary) reaches its limit, the second number (Secondary) is then incremented.
For example, assume serial numbers 1 and 2 are being used in a layout as shown
below: After the next print cycle, Serial Number #1 will increment by 1 to 99 and Serial Number #2 will be unchanged. After a second print cycle, Serial Number #1 will increment by 1 to 100. This is beyond the upper limit of 99, so Serial Number #1 will roll over to its lower limit value of 1. Since a roll over occurred, Serial Number #2 will be incremented. Since its Increment value is 2, it goes from 10 to 12. Additional groups of serial numbers work in exactly the same way, but are completely independent of other groups. The data you must supply to use the serial number feature are:
If a negative number is specified to the Increment field, then the serial number will decrement after each successful print cycle. In this case, when the number gets smaller than the lower limit value, then the value rolls over to the upper limit value. Note that the increment values for the linked serial number do not have to have the same magnitude or sign. To add a serial number field to your tag layout, you must include the Serial Number Flag. This is a percent sign (%) followed by the number of digits in the number, followed by the letter S, followed by an optional designator for the serial number sequence (1-n). For example:
%6S1 - Six digit serial number created from Group 1, Primary sequence (#1). Note that if you do not indicate which field to use, it assumes field #1. For example, %4S will create a four-digit number from Serial Number Group 1, Primary sequence (#1) and is equivalent to %4S1. The number following the S in the flag indicates both the group and the sequence within the group. Group 1 uses sequence numbers 1 and 2 (Primary and Secondary respectively.) Group 2 uses sequence numbers 3 and 4. Group 3 uses sequence numbers 5 and 6, and so on. In special cases, it may be desirable to increment the serial number within the layout itself. For example, you may want to print the current serial number in one location on the tag, but print the next serial number in another location. To accomplish this, you may optionally specify an addition or subtraction operation in the serial number specification. To add a value to the current serial number, immediately follow the serial number specification with a plus sign and then the value to add. For example, to add one to the current 4 digit serial number, enter your specification as %4S+1 To subtract one, enter %4S-1 Note that you must have a space or other non-digit character following the number to add or subtract. When adding or subtracting numbers, you will probably also want to change your serial number increment value accordingly. In our previous example where we were adding a one to the value, you would set your serial number increment to two.
|
Method 2 - Alpha / Numeric SequencingThis method is used when you want to sequence a field that contains letters as well as numbers. To enable this feature, you must enable the "Auto Sequence the Text" property in the Text Field Property Editor for the field you want to sequence. When the "Auto Sequence the Text" property is enabled, three additional properties must also be set: Sequence
Direction
When
Note that if the text field is specified as an operator entry field (e.g. %2V) then whatever the operator enters into the field at print time will be the text that is sequenced. |