 |

LabeLase� Producer
|
|
LabeLase� Producer
|
IntroductionThe purpose of this tutorial is to present step-by-step instructions for configuring LabeLase® Producer tag production software to use the File Transfer method to receive downloaded tag data from your computer. We will begin by describing the file transfer method of data transfer and why it is considered the easiest way to get data into LabeLase® Producer. We will then discuss the need to create a shared folder that is accessible by both the local PC (running Producer) and the host computer (the source of the data.) Next we will describe how to configure Producer to accept the transfer data file. This tutorial assumes that you have already installed the software and connected the tag printer to your PC.
|
||||||
Why Download Data?Some installations of the LabeLase® 1000 tag printer are completely stand-alone - that is, the data that gets printed on the tags is either entirely self-generated, gets manually keyed into Producer by an operator, or is imported from an Excel spreadsheet. In these installations, the PC running Producer may or may not be connected to some kind of computer network. It doesn't really matter since the printed data is not coming from an external computer (called the host.) Most printer installations, however, have the requirement of obtaining at least part of the printed data from some external information system such as an order system, product tracking system or some other database. In these installations, it is impractical or impossible to expect a human operator to manually transcribe the data from the source computer system into LabeLase® Producer running on the local PC. These are the installations where automatic download of print data to Producer is required.
|
||||||
Why the File Transfer Method?Since you are still reading, you must need to get your print data from another computer, and automatically send it to LabeLase® Producer. Where your data resides and how you extract it is up to you and entirely beyond the scope of this tutorial. We must assume that you can obtain the data using some kind of computer programming language and format it so that Producer can use it. Of the three methods of sending data to LabeLase® Producer, serial RS232, network TCP/IP and File Transfer, the third method, File Transfer, is the simplest to implement. Writing communications drivers as required by the serial method, or using stack API's as required by TCP/IP can be difficult for all but very experienced programmers. Plus, the serial RS232 method requires you to have an available COM port on your host computer, which often requires adding additional hardware such as a terminal or print server, and you would also need a spare COM port on the Producer PC and these ports are no longer standard on modern PC's. However, writing data to a file is simple and straight forward for even novice programmers. This tutorial assumes that you can write a software program that will create a file on a hard drive, write formatted data to that file, and then close the file.
|
||||||
Shared FolderThe first step in getting the File Transfer method to work is to setup a shared folder that is accessible to both LabeLase® Producer and to your program running on your host computer. We recommend that you locate this shared folder on the PC that is running Producer. Since Producer checks this folder once each second to see if you have written a file, placing the folder on another computer or server on the network will add unnecessary network traffic. Plus, if there is a network problem that makes the shared folder inaccessible, this would cause Producer to generate errors while trying to access it. A folder that is local to the Producer PC will always be accessible and won't generate network traffic as it is monitored. Once you decide where the shared folder will be located, you must create the folder if it doesn't already exist. We recommend that you create a folder under your C: drive called infosight since this is the default folder that Producer will monitor. You don't have to use this folder, since Producer can be configured to look in any folder you desire, but if you do use c:\infosight then you will have one less step to perform. After creating the folder for Producer to monitor, you must share it on your network so that your program running on your host computer can access it. How you create a shared network folder depends on the version of Windows running on the Producer PC, and is beyond the scope of this tutorial. Additional information can be found for Windows 2000 and for XP. Contact your network administrator for help in sharing a folder on your network.
|
||||||
Transfer File NameOnce you have created the shared folder, you must next decide on the name of the data transfer file. The default name expected by Producer is transfer.txt, but this name can be changed in the Host Configuration dialog. The exact name or naming scheme you choose depends on how your application expects to create tags. One thing to keep in mind as Producer monitors the shared folder, is that it will look for the creation of the data file once each second. As it sees the file appear, it will read its contents, add the data to its internal message queue, and then delete the file. If your application requires you to send data to Producer (print a tag) less frequently than once per second (that is, more than a second will pass between data transfers) then you can stick with using a transfer file name like transfer.txt since you will be re-creating a new file each time after Producer deletes it. However, if you need to send a new file before Producer has read the previous file then you will need to use multiple files with similar naming conventions and configure Producer to look for a wildcard file specification. For example, you could number your file names such as transfer0001.txt, transfer0002.txt, transfer0003.txt, etc. and configure Producer to look for transfer*.txt. Producer will read the files in the order of their creation times. An alternative to sending multiple files as shown above is to put all of the print records into a single file. The file format allows multiple records separated by carriage return / line feed characters. As long as you can put all of your data into one file, and don't need to create another file within one second of the previous one, you won't need to use multiple file names. Note that regardless of how you choose to name your transfer file(s) you must still make sure to check the folder before creating a file to see if one already exists with the same name. If a file already exists, you should delay for about a second and check again. If, after a few tries and delays, the file still exists, then you must assume that Producer is not monitoring the folder. At that time you should abort the process and declare an error in your system. For the remainder of this tutorial, we will assume that the transfer file will be written with several seconds between each transfer, so Producer will be configured to watch for a single file named transfer.txt.
|
||||||
Transfer File FormatThe data that you put into the transfer file will be read by Producer and interpreted according to its configuration. During this interpretation, the data fields will be extracted from each record in the file and applied to the tag layout. The transfer file can consist of one or more records, each separated by one or more record terminator characters. Each record corresponds to a print job. You must decide what character or characters to use as the record terminator. We recommend that you use the familiar carriage return / line feed characters to terminate each record as this is a very common technique and it is the default configuration for Producer. Another benefit is that it allows you to use Windows Notepad to create test files since pressing the Enter key in Notepad causes the CR/LF characters to be added to the end of the line. Each record is composed of one or more fields, each separated by a data field separator character. The most common character to use for the field separator is the comma. However, this won't work properly if the data you are sending to be printed does or may contain the comma character. In these situations, you must select a different separator character such as a TAB character. The first three fields of each record are optional (by configuration) and can be used to specify the following: Tag Layout Filename - The first optional field is the name of the tag layout file to be printed. The advantage of including the layout file name is that it allows you to switch the tag layout on-the-fly as you print. If your application will always print the same layout then there is no need to include this field in the download. If you include this field, you must specify the full name of the layout file including the .itl file extension. (e.g.: MyLayout.itl) You may also specify a full path name and we encourage you to do so since it will ensure that Producer can find the file. If you don't specify the full path name, then Producer will look in the folder that contains its executable program file, and if it can't find the layout there, it will look in the folder where the operator last loaded or saved a layout file. If the layout can't be found, Producer will display an error message. Quantity - The second optional field is the number of tags to print. You can set this field to a number greater than 1 to print multiple tags. If you always intend to print one tag for each record, then this field may be omitted. If your layout contains a serial number field, or some other auto sequencing field such as a time or date code, then these fields will sequence between each tag printed. Copies - The third optional field is the number of exact copies of each tag to print. If you always intend to print one copy of each tag, then this field may be omitted. Note that auto sequencing fields like serial numbers, time and date codes do not change between copies. Each of these fields is enabled by default, but can be disabled individually in Producer's configuration. That is, you can choose to include the layout filename, but not the quantity or copies. Or you can include the quantity but not the layout filename or copies. Or you can choose to skip all three fields entirely and simply begin each record with the data for the first printed field. Below are three examples of transfer files with various fields:
However you choose to use these first three optional fields, be sure that you always send the proper format. These examples use the comma as the field separator.
|
||||||
Tag LayoutAs Producer reads the data in your transfer file, it extracts the data fields and inserts the data into the appropriate fields in the layout. How does Producer know where to put each of your downloaded fields? That is controlled by how you created the layout in the first place. If you have never created a tag layout with LabeLase® Producer then you should take some time now to work through the tutorial on creating a tag layout. Pay close attention to the section on Operator Data Entry fields since it is an important part of the host data transfer process. When creating a tag layout, you will have some fields that never change, such as labels - they always print the same text on every tag. Other fields change frequently (perhaps on each tag) and need to be entered by the operator who is printing the tags. Producer allows you to create special layout fields called Operator Data Entry fields. When you create Operator Data Entry fields in your layout, and link them to the text to be printed, the operator can manually key in the data just prior to printing the tags. However, the term Operator Data Entry fields can be confusing because they are used not only by the operator for manual entry, but also as the destination for the data sent in the host transfer file. Each data field in the transfer file (FIELD1, FIELD2, FIELD3 in the above examples) is placed one-for-one into the Operator Data Entry fields of the layout, in the order they appear. FIELD1 goes into Operator Data Entry field 1, FIELD2 into Operator Data Entry field 2, and so on. When you create you tag layout, you must create an Operator Data Entry field for each piece of data that is to be sent by your host computer in the transfer file. Then, in your transfer file, you provide each of these fields separated by your chosen field separator character. At the end of your field list are your chosen record terminator character(s) (usually CR/LF).
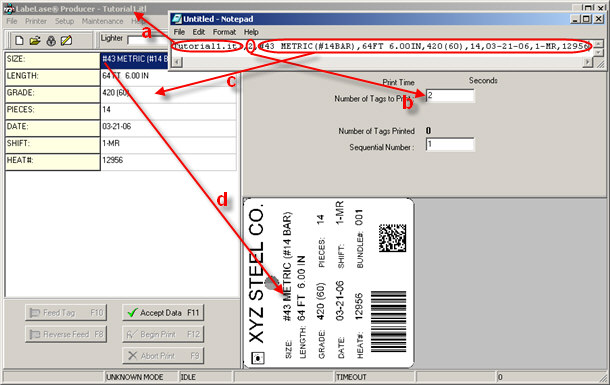
The following figure illustrates the relationships between the host downloaded data, the operator data entry fields, and the tag layout text fields.
The figure shows Windows Notepad with one line of text (record) destined for LabeLase® Producer. Behind the Notepad window is Producer. The arrows show how the data in the transfer file flows into Producer. a - The first field in the transfer file is the name of the layout file. An arrow points to the title of the Producer window showing the same layout file loaded into Producer. Thus, this first field causes Producer to load the specified layout. b- The next field in the transfer file is the quantity of tags to be printed. This value goes directly into the "Number of Tags to Print" field of Producer and will cause two tags to print in this example. c- The actual data fields are the remainder of the record in the transfer file. An arrow shows that the data in each of these fields goes one-for-one into the Operator Data Entry fields. d - Finally, the data in the Operator Data Entry fields goes into text being printed on the tag.
|
||||||
Host Communications SetupSo far we have performed the following steps:
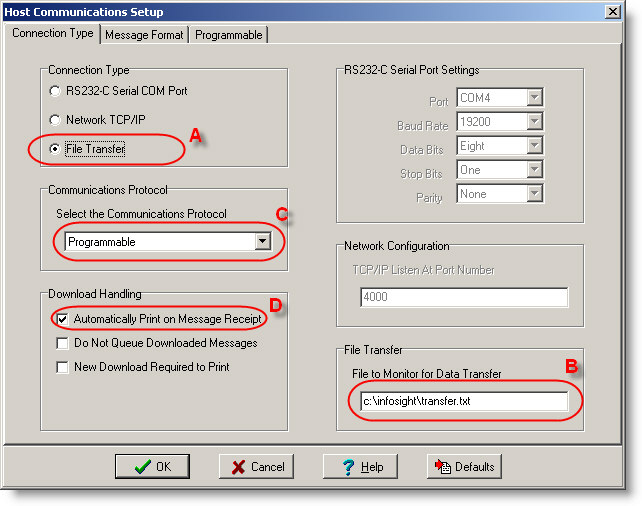
Now we can configure LabeLase® Producer to pull all of this together to perform our data transfer. We do this with the Host Communications setup dialog. From supervisor mode, pull down the Setup menu and select Host Communications. The Host Communications dialog will appear as shown below:
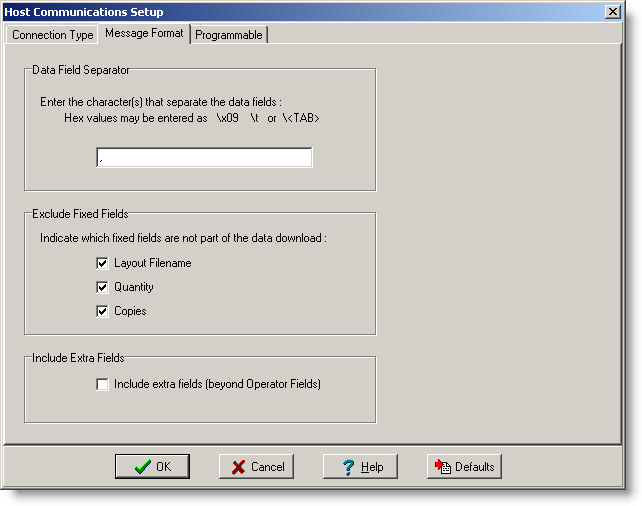
The figure above shows the Connection Type tab of the Host Communications setup dialog. The hilighted fields indicate the important settings related to the file transfer method of data transfer. A - Set the File Transfer connection type first. B - File to Monitor for Data Transfer. This is the full path and file name (or wildcard specification) of the transfer file. C - Communications Protocol. The Programmable protocol is the best to use for the File Transfer method although other protocols are available as needed. For this example we are sticking to Programmable. D- Automatically Print on Message Receipt - We are checking this box to ensure that a tag gets printed as soon as the data is transferred. Without this box checked, the data would be placed into the print queue, but an operator would have to manually initiate each print cycle. After setting these four fields, select the Message Format tab to configure the transfer file's data format as shown below.
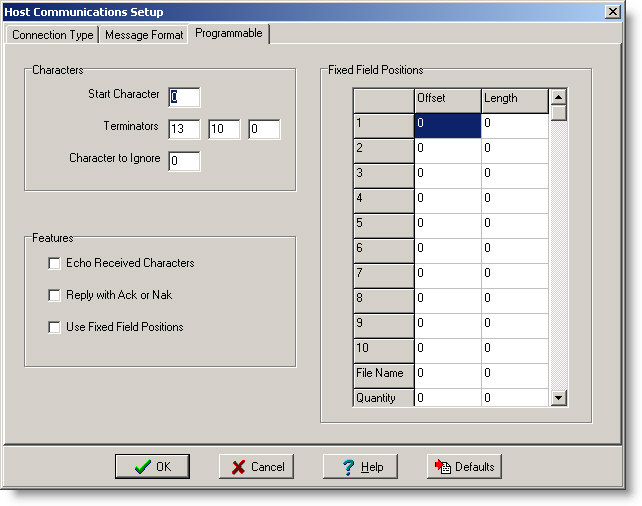
Data Field Separator - This is the character that you will place in each record to separate the individual data files. The default is a comma character and it may be suitable for many applications. However, if the data you are sending contains any comma characters as part of the fields to be printed, then you must select another separator character. In these cases, we recommend using an ASCII tab character and you would enter it as \t or \<TAB>. Exclude Fixed Fields - This is where you indicate which, if any, of the Layout Filename, Quantity or Copies fields are included in your transfer file. If the field is not in your file, check the corresponding box. Include Extra Fields - This feature is provided for use in very rare cases when the normal formatting options are not adequate. Misuse of this feature can cause your layout files to be modified in unexpected and unwanted ways. We highly recommend that you leave this box unchecked unless specifically told to by an InfoSight engineer or technician. After setting these options, select the Programmable tab to configure the transfer file's "protocol" as shown below.
The default settings of this tab are correct if your transfer file will use the carriage return (13) and line feed (10) characters as the record terminator. If you plan to use different terminator characters, enter their decimal equivalent values into the Terminators fields. You may specify up to three terminator characters. Unused terminator values must be set to zero.
Once you have completed the setup of the Host Communications dialog, click the OK button to save your settings and enable the transfer process. Producer will begin monitoring for the transfer file and producing tags.
|
||||||
Troubleshooting
Producer is not deleting my transfer file.
Producer is deleting the transfer file, but is not printing my tags.
The data is getting into Producer, but it is "shifted" and is being printed in the wrong fields.
|
||||||
ConclusionThis concludes our tutorial on configuring LabeLase® Producer to accept data using the File Transfer method.. In this tutorial we showed how to setup the shared transfer folder and configure Producer to monitor it. We also showed how to create your transfer file and talked about the importance of having each record properly terminated, even if the file only contains one record. We also showed the Host Communications dialog and the various settings needed for file transfer. Finally, we provided troubleshooting hints to help diagnose problems with the transfer process. If you have any additional questions about configuring LabeLase® Producer for the File Transfer method of data download, please contact the factory at 740-642-3600. Thank you for your interest in our LabeLase® products. |
Copyright © 2010 InfoSight Corporation All Rights Reserved
InfoSight ® is a registered trademark of InfoSight Corporation