 |

LabeLase� Producer
|
|
LabeLase� Producer
|
|
GS1 Barcode Wizard Form The GS1 Barcode Wizard form will aid you in creating the text to be encoded in a GS1 Databar (formerly RSS-14) barcode. This format requires very specific content and formatting, which can be difficult to generate manually. This wizard will walk you through the steps to create a properly formatted GS1 text string. Note that the wizard is available in both the barcode and text field editors, making it possible to create the man-readable printed text as well as the data encoded in a barcode.
|
| Getting Started
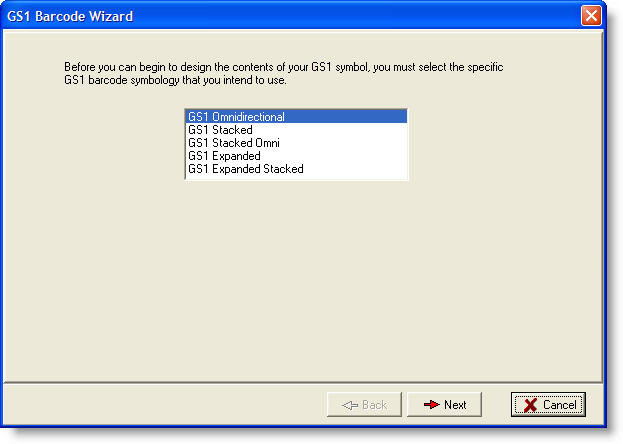
The GS1 Barcode Wizard is only applicable to the GS1 Databar family of barcode symbologies. If you start the wizard from the text field editor, or from the barcode field editor prior to selecting one of the GS1 barcode symbologies, the wizard will begin by asking you to select the specific GS1 barcode symbology you intend to use as shown below:
Select the version of GS1 that you need and click the Next button. The next page you see depends on the specific GS1 version that you select.
|
| GS1 Omnidirectional, GS1 Stacked, GS1 Stacked Omni
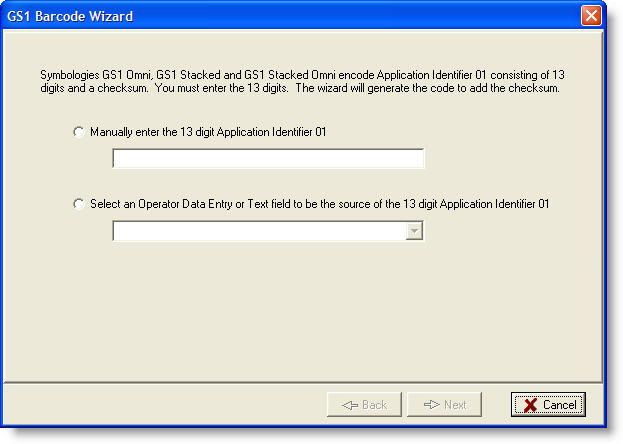
These GS1 varieties are used to encode Application Identifier (AI) 01 plus 13 digits and a checksum. You must supply the 13 digits either directly, or as a link to a Operator Data Entry or text field.
Select the source of the AI(01) information. If you choose to manually enter the 13 digit AI, you must type in exactly 13 numeric digits. When the tag is printed, the numbers you enter will be printed. If you choose to select an Operator Data Entry or Text field, you must then select the desired field from the drop down list:
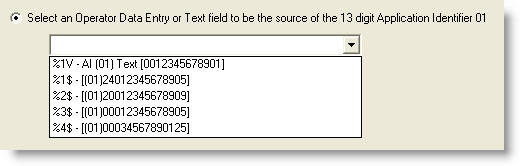
In the example above, there is one Operator Data Entry field (designated by %1V) and four Text fields (designated by %1$ through %4$) that can be the source of the Application Identifier (01). When the tag is printed, the contents of the selected field will be used to create the text. Once you have selected the source of the AI(01) data, click the Next button. The wizard will show you the final text to be displayed or encoded as shown below:
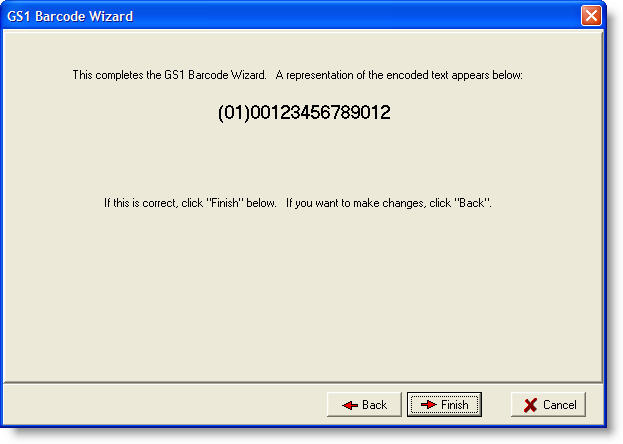
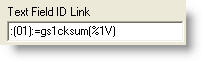
Note that the AI(01) identifier has been added to the front of the text, and that the checksum digit has been added automatically to the end of the text. The barcode field's link, as created by the wizard, is shown below:
Notice that the data to be encoded comes from Operator Data Entry field number one (%1V) and that the checksum is added by the gs1cksum() function.
|
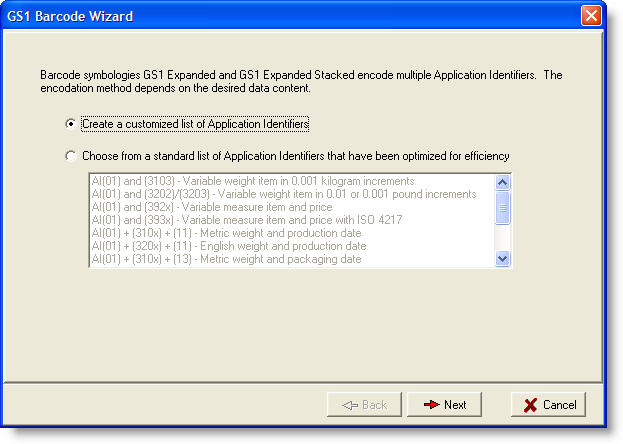
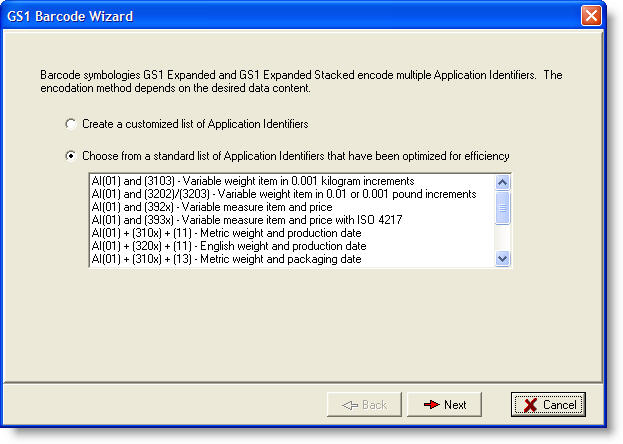
| GS1 Expanded, GS1 Expanded Stacked
These GS1 varieties are used to encode different combinations of Application Identifiers, each with very specific uses and applications. After selecting an Expanded version of the GS1 family, the wizard will ask you to determine the method of encoding the data in the barcode as shown below:
Here you have the option of creating a customized list of Application Identifiers to match the specific requirements of your application, or to select from a short list of standard AIs that have been optimized for efficiency. Make your selection and click the Next button. Customized List of Application Identifiers
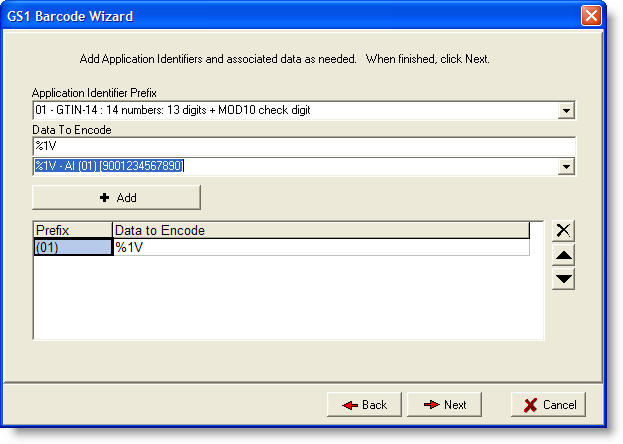
If you chose to create a customized list of Application Identifiers, the wizard will proceed to the screen shown above. Here you can build a list of the Application Identifier prefix codes and the source of the data associated with each AI. Pull down the list of Application Identifier Prefixes and select the desired prefix. There are about 100 different AI prefix codes to choose from. After selecting your prefix, enter or choose the Data to Encode. You may enter constant data, Operator Data Entry field flags, or Text field flags as needed. Just below the Data to Encode field is a pull down list of the Operator Data Entry and Text fields currently defined in your layout. Choose one of these entries to put it in the Data to Encode field. Once you have specified an AI Prefix and the Data to Encode, click the Add button to add it to the list at the bottom. You can delete items from the list, or move items up or down as needed using the buttons to the right of the list. Note that the list must contain the exact items to be encoded, in their exact order. When you are finished building your list, click the Next button. This will bring you to the final screen of the wizard and show you the final text to be printed or encoded. Efficient Standard Application Identifiers
When you select one of the standard Application Identifiers and click the Next button, you will be asked to supply information that is specific to the selected identifier. Each standard AI includes an (01) element, for which you must specify the source. Along with AI(01) you must also indicate the source of additional data fields as shown in each example below:
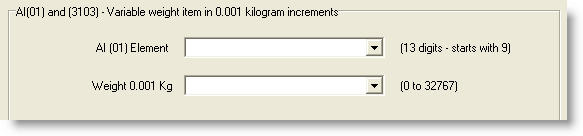
Specify the source of the weight in 0.001 kilograms. The value must be within the range from 0 to 32767.
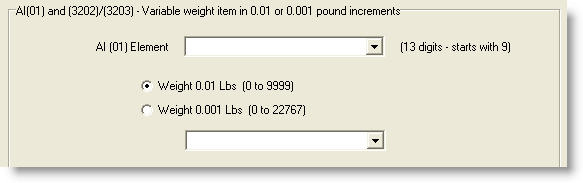
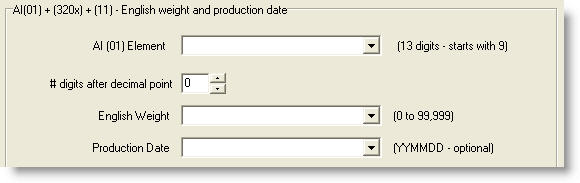
Specify the source of the weight. You must also indicate if the weight is in units of 0.01 pounds (0 to 9999) or 0.001 pounds (0 to 22767).
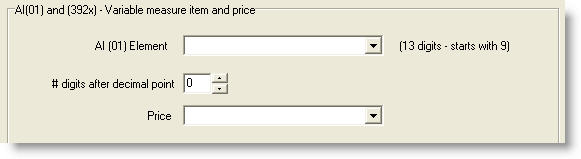
This item includes a price field. You must enter the source of the price information and inicate the number of digits after the decimal point.
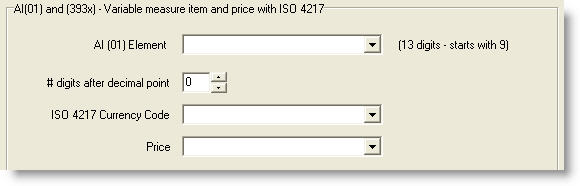
This items includes a price and an ISO 4217 currency code. Specify the number of digits after the decimal point for the price, plus the source of the currency code and price.
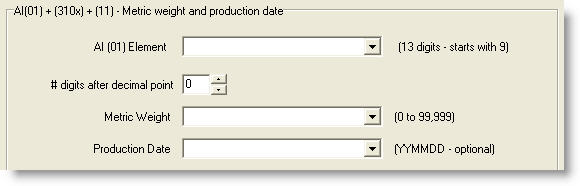
The previous two examples include a weight value and a production date. You must specify the number of digits after the decimal point for the weight. Also indicate the source of the weight and date fields. The weight value is limited to 99,999 and the date must be of the format YYMMDD. The date field is optional and can be left blank.
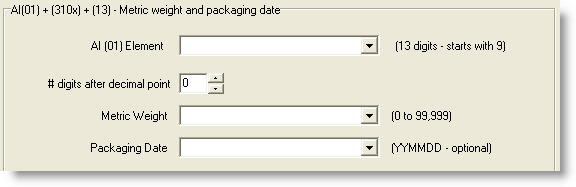
The previous two examples include a weight value and a packaging date. You must specify the number of digits after the decimal point for the weight. Also indicate the source of the weight and date fields. The weight value is limited to 99,999 and the date must be of the format YYMMDD. The date field is optional and can be left blank.
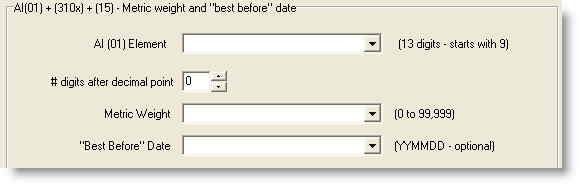
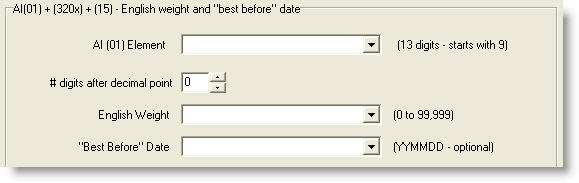
The previous two examples include a weight value and a "best before" date. You must specify the number of digits after the decimal point for the weight. Also indicate the source of the weight and date fields. The weight value is limited to 99,999 and the date must be of the format YYMMDD. The date field is optional and can be left blank.
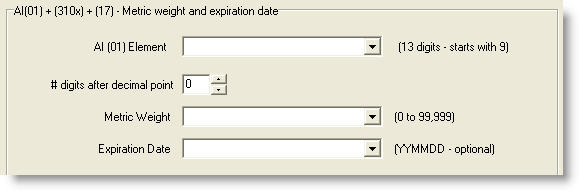
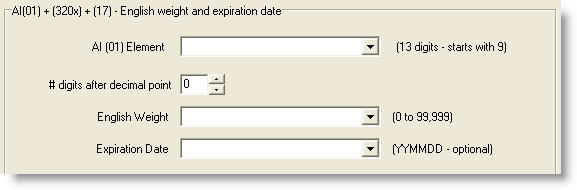
The previous two examples include a weight value and an expiration date. You must specify the number of digits after the decimal point for the weight. Also indicate the source of the weight and date fields. The weight value is limited to 99,999 and the date must be of the format YYMMDD. The date field is optional and can be left blank. Note that each of these fields can be filled in manually or selected from a list. Also, you can enter data that is directly encoded or is linked to an Operator Data Entry or Text field. After supplying the indicated fields, click the Next button to continue. The wizard will show you the final text to be printed or encoded. |
Copyright © 2010 InfoSight Corporation All Rights Reserved
InfoSight ® is a registered trademark of InfoSight Corporation